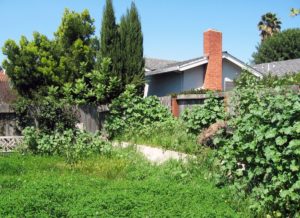
 Clearing brush could be as easy as trimming your hedges, mowing the lawn, and weed eating but if you’ve allowed things to go or just bought a neglected property, the task of clearing brush may seem overwhelming. This guide will give you a play-by-play to help make reviving your backyard easier. We’ll provide you with everything you need to take charge from where to start, to gathering tools and materials, and how to dispose of brush. That being said, we believe it it will be best for your stress levels and health to just let a professional clear the brush for you. The expertise and tools owned by professionals that complete these types of projects will save you time, hassle and more.
Tackling the Prep Work
- Inspect Your Land – Creating a plan is the first step to conquering any goal— this includes tackling yard work. Walk through your space and assess what needs to be done. Once you’ve looked at the bigger picture, you’ll be able to decide the most efficient way to remove brush and overgrowth. Use blue paint to mark trees that need to be removed. Document areas with excessive overgrowth that needs to be cleared. Tip: write down areas of your yard that may be more challenging to work on like areas that are rocky or swamp-like as well as other things that may pose a problem.
- Remove the Brush – The size of your project matters. In some cases, your weekly garbage collection might be enough to haul off your brush. If you are taking on a bigger task, you might look to see if your community offers a brush collection day and plan around that. If not, you could consider turning the brush into composite or renting a yard waste dumpster. Between the dirt and rocks to limbs and shrubs, dumpster rentals are a good choice to ride your yard of brush easily and on your timeline.
- Gather Necessary Tools & Materials – As you plan to clear your brush, one thing is certain— you will need tools. No matter if you are choosing to clear the brush by hand or with the assistance of power tools, there are several options on the market to make this task easier. Chainsaw, Ax, Shovel, Stump Grinder, Weed Eater, Bow Saw, Tree Pruner, Rake, Machete, Eye Googles, Gloves, Helmet, Heavy Duty Waste Bags, Long Sleeve Shirts and Full Length Pants, and Extra Dirt/Topsoil. Tip: Use a mix of both power and hand tools as this will help you ensure you’re able to get the job. If you aren’t familiar with or comfortable using any of the required tools, you should consider hiring someone who can to keep from being injured or running into bigger problems.
Clearing Brush & Undergrowth
- Removal/Cut Down Trees – As part of your prep work, you marked the trees that you wanted to remove. Once you finalize your decision, you will be ready to cut those down. This is the first step to removing your brush and undergrowth. Tip: while you are likely able to remove small trees on your own, medium and large sized trees can are dangerous to cut down without the necessary equipment and skills. For this reason, we advise contacting a professional to remove large trees. Cutting Down Small Trees: 1) Use paint to mark the tree around approximately one foot above the ground. 2) With an ax or chainsaw, cut the tree where you marked it at a 45 degree angle until you are a third of the way through the trunk. Be sure to cut into the side of the tree that you would like it to fall. 3) Cut a 45 degree wedge on the opposite side just a little higher than your first cut on the other side. This cut should go halfway through the trunk. 4) You should now be able to push the tree towards the side where you made your initial cut. If it does not fall, use a bow saw and continue to cut until the tree starts to fall. 5) Repeat the steps above to remove any other small trees you have marked. Removing a Tree Stump: Now that you have cut down your trees, you will need to remove their stumps. There are several options to complete this tasks depending on the size and quantity of the stumps. Here are just a couple of those methods: 1) Use a shovel to dig them out— this trick works better when the stumps are small and have a shallow root system. Dig on top of the roots until they are exposed, then use an ax or pruning shears to loosen up the stump. Once you do this, you should be able to pull the step out of the ground. 2) Use a stump grinder to remove them— this is a good choice if you have a small stump with a difficult root system and medium/large stumps with shallow roots. Don’t own a stump grinder? You can rent one from your local home improvement store at an hourly rate. Once you remove the stump, be sure to fill in the hole with topsoil or dirt to flatten the surface. Tip: if you brought in a dumpster to dispose of your brush, double check with the rental company prior to tossing your trees. Some regions have restrictions on the length and circumferences of tree lumps and stumps that can be hauled off and disposed of.
- Removing Shrubs – Once you remove your desired trees, your next step is to get rid of mid-size and large shrubs. You might be able remove smaller shrubs by hand but large shrubs will likely require a shovel to dig out the roots in order to remove them. Tip: prune back small branches on the shrub; this makes digging them out less challenging. You can remove your shrubs simply by pulling them out or trimming them with a pruner then pulling them out. Use a shovel to remove the stump and roots of the shrubs.
- Clearing Undergrowth – After you have removed larger plants, you will be ready to dive into the thick of it. Tall grass, weeds, vines, small bushes and plants remain and it’s their to go. Gather your weed eater, machete, pruner, and dive in. Tip: for this step we advise wearing long sleeves and pants. These help to protect you skin from poisonous plants that you might not recognize or see. Removing Vines and Weeds 1) Use a tree pruner to cut thick vines and brambles and then toss them aside. While wearing thick garden gloves, pull large weeds out at their base ensuring that you get the root and all. Trim What’s Left – This is the easiest step by far— use your weed eater or machete to trim down the rest of the existing vegetation. Cut as low to the ground as possible. If you have excessive overgrowth that is relatively tall, cut it down halfway on your first go around and then come back to cut it all the way down to the ground. If the brush is thin, you might be able to use a lawn mower to tackle this step. Tip: Be sure to clean out the deck of your mower as necessary and watch closely for any thick roots or other brush, rocks, etc. that could damage your mower.
- Discard Debris – You’ve made it to the final step, grab your rake and clear any remaining brush. As your gathering what’s left, create piles based on how your disposing of the brush. If you plan to compost some, toss other into your weekly trash collection pile, or maybe you rented a yard waste dumpster— sorting the debris as you rake it up will make disposal easier.
Creating the Backyard of Your Dreams
Now that you’ve cleared your backyard, you might be wondering what’s next. The possibilities are endless and can be completely customized to suit your needs and budget.
View Some of Our Latest Brush Removal Projects | Click Here
Contact us (513) 550-7782 for more information -or- to setup an free consultation!
—
 About D2 Landscaping & Outdoor
D2 Landscaping is one of the fastest-growing landscaping company in the Cincinnati/Northern Kentucky area. We are a local and family-owned landscaping company offering a variety of landscape services, from new installations and complete renovations, to simple improvements. Whether you want to add a few trees and shrubs to compliment your existing landscape, or a complete makeover with outdoor living areas, our team can transform your outdoor dreams into reality. We pride ourselves in offering timely and professional services with highly trained personnel. We use superior advanced products along with precise installation techniques to guarantee your perfect vision. Our high level of standards continue to produce the best quality product resulting in glowing client testimonials, referrals, and customer loyalty.
>> Learn More